Deploy in low-latency
Summary
- What is low-latency mode?
- Deployment Creation Step by Step
- Monitoring Low Latency
- Preloading data for low-latency
What is low-latency mode?
Introduction
The Craft AI platform offers two pipeline deployment modes:
- Elastic: This is the default mode. It emphasizes simplicity of use.
- Low-latency: This mode is designed to achieve faster pipeline execution times.
A pipeline deployment always has a mode, and an execution rule such as "endpoint" or "periodic". More detail about deployment on this page.
Before delving into how the low-latency mode operates, let's establish some key points about the deployment modes.
Note
The new deployment method does not give rise to any additional financial costs, as it remains in the same environment.
Elastic Mode
This is the default mode for deployments. In this mode, executions are stateless.
This means that executions in Elastic mode are self-contained and independent from each other, since a unique temporary container is created for each execution. In this mode, executions use all the available computing resources automatically, and no resource is used when there is no execution in progress.
Advantages:
- Automatic resource management
- No memory side effects executions
Disadvantage:
- Slower individual execution time
Technical information
In this context, a "container" refers to a pod in Kubernetes. This mode creates a pod with the required dependencies for each execution, executes the code, and then destroys the pod. This approach enables stateless execution but contributes to an increase in execution time.
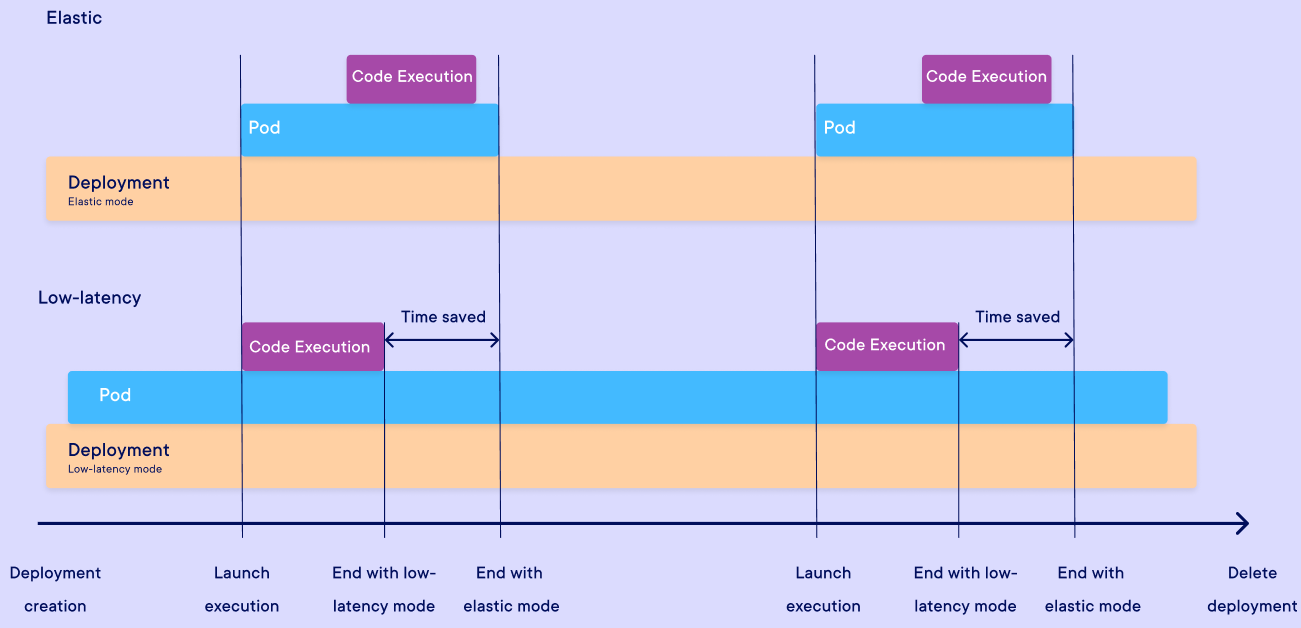
Low-latency Mode
With this mode, an execution container called a pod is initialized ahead of time, ready for executions.
As a result, the execution time in this mode is faster than in elastic mode. It is designed for use cases that require fast response times or have long initialization times.
Note
The faster execution time in this mode comes from gains in how executions are started and stopped, it does not mean that computation is faster. The time taken to compute the same code during an execution in both modes remains the same, depends on the computation resources of the environment.
All executions for a low-latency deployment share the same pod, where memory is shared between executions.
A low-latency deployment pod uses computation resources from the environment, even without any execution in progress. And all executions for a deployment run on the same pod. So you need to manage the computation resources of the environment.
Advantage:
- Faster execution time
Disadvantages:
- Manual resource management
- Memory side effects between executions
Technical details
When creating a low-latency deployment, the associated pod is created before any execution can start. It starts the process where executions will run, with the dependencies required to run your code. A pod can only handle one execution at a time, but Python global variables are shared between executions.
Info
The support for multiple pods per deployment or multiple executions per pod is coming soon.
Summary
For real-time response, use low-latency mode. Otherwise, keep the default mode, elastic mode.
It is important to note that selecting low-latency mode results in a shared execution context between executions in the same deployment, and in a continuously active pod, which requires monitoring resource usage throughout the deployment's lifespan.
Note
The run_pipeline() function does not create a deployment, but its behavior is similar to that of the elastic deployment mode.
Deployment Creation
In this section, we'll look at the steps involved in creating a low-latency deployment using the Craft AI SDK.
Note
If you have already initialized your SDK with your environment and are familiar with the creation and use of elastic deployment, this section is not applicable. Otherwise, please refer to the relevant documentation here.
To achieve our first low-latency deployment, we will utilise a basic Python script that multiplies two numbers:
Warning
Remember to push this source code to Git so that the platform can access the Python script for execution.
The approach for creating the step and associated pipeline remain the same, regardless of the chosen deployment mode:
# IO creation
step_input1 = Input(
    name="number1",
    data_type="number",
)

step_input2 = Input(
    name="number2",
    data_type="number",
)

step_output1 = Output(
    name="resultMulti",
    data_type="number",
)

# Step creation
sdk.create_step(
    function_path="src/multipli.py",
    function_name="entryStepMultipli",
    step_name="multi-number-step",

    inputs=[step_input1, step_input2],
    outputs=[step_output1],
)

# Pipeline creation
sdk.create_pipeline(pipeline_name="multi-number-pipl", step_name="multi-number-step")
The deployment_mode parameter is initially set to low_latency upon creation.
However, it takes a few tens of seconds for the deployment to become active. You can use a loop to wait for it to be ready, as shown here.
# Deployment creation
endpoint = sdk.create_deployment(
    execution_rule="endpoint",
    pipeline_name="multi-number-pipl",
    deployment_name="multi-number-endpt",
    deployment_mode="low_latency",
)

# Waiting loop until deployment is ready
update_status = None
while update_status != 'success':
    update_status = sdk.get_deployment("multi-number-endpt")['update_status']
    if update_status != 'success':
        print("waiting endpoint ready...", sdk.get_deployment("multi-number-endpt")['update_status'])
        time.sleep(5)
deploi_info = sdk.get_deployment("multi-number-endpt")
print(deploi_info)
After deployment, it operates like an elastic deployment. It can be triggered through the SDK or other methods such as Postman, curl, or JavaScript requests:
const ENDPOINT_TOKEN = "your-endpoint-token";

// Endpoint inputs: Commented inputs are optional, uncomment them to use them.
const body = JSON.stringify({
    "number1": 3,
    "number2": 4,
});

fetch("https://your-env-name.mlops-platform.craft.ai/endpoints/multi-number-endpt", {
method: "POST",
headers: {
    "Content-Type": "application/json",
    Authorization: `EndpointToken ${ENDPOINT_TOKEN}`,
},
body,
})
.then((response) => {
    if (!response.ok) {
    return response.text().then((text) => {
        throw new Error(text);
    });
    }
    return response.json();
})
.then((data) => {
    // Handle the successful response data here
    console.log(data);
})
.catch((error) => {
    // Handle errors here
    console.error(error.message);
});
Tip
As with elastic deployments, low-latency deployments linked to the pipeline can be viewed on the pipeline page of the web interface, along with the relevant information and executions.
Monitoring Low Latency
As previously mentioned, deploying with low-latency introduces additional complexity. To effectively monitor deployment activity, the platform offers various information:
- Status: Information on the deployment lifecycle at a given point in time.
- Logs: Historical and detailed information on the deployment lifecycle
- Version: Information on the deployment update
Status
Low latency deployments have two additional specific statuses:
deployment_health: Represents the potential availability of the deployment. If enabled and this status is set toReady, then the deployment is ready to receive requests.update_status: Represents the loading of a pod into the deployment. Note that this does not necessarily correlate with the health of the deployment.
Warning
These two statuses are different from the 'is_enabled' parameter, which represents the user's chosen deployment availability.
These statuses are available in the return object of the get_deployment() function:
Note
The pod has a specific status in addition to that of deployment.
Deployment logs
During its lifetime, a low-latency deployment generates logs that are not specific to any execution but are linked to the deployment itself. You can use the get_deployment_logs() function in the SDK to get them.
from datetime import datetime, timedelta

sdk.get_deployment_logs(
    deployment_name="multi-number-endpt",
    from_datetime=datetime.now() - timedelta(hours=2),
    to_datetime=datetime.now(),
    type="deployment",
    limit=None
)
Deployment update
A low-latency deployment can be used to reload the associated pod. To do this, you can call the SDK's update_deployment() function:
Preloading data for low-latency
Warning
Configuration on demand is an incubating feature.
Concept
When using low-latency mode, it is important to note that this implies continuity between executions. This is because the pod that encapsulates the executions remains active throughout the lifetime of the deployment.
As a result, there is memory permeability between executions. Each execution runs in a different thread in the same process. While this feature can be advantageous, it must be used with care. It allows data to be loaded into memory (RAM and VRAM) prior to an execution by using global variables in Python.
How to do that
The code, specified in the function_path property, when the step was created, is imported during the creation of a low-latency deployment. This enables the loading of variables prior to the first deployment run.
Note
A global variable can also be defined “only” in the first execution by creating it only in the function.
Once the data has been loaded into a global variable, it can be read in function executions.
Note: That this does not require any changes to the creation of platform objects (step, pipeline, etc.) using the SDK.
Warning
If the pod is restarted (after a standby, for example), the loaded data is reset as when the deployment was created.
Examples
Simple example
# Import lib
from craft_ai_sdk import CraftAiSdk
import os, time

# Code run at the low latency deployment creation
count = 0
loaded_data = [2, 3, 5, 7, 11, 13, 17, 19, 23, 29]

print ("Init count at : " + count)

# Function who will be run at each execution
def my_step_source_code():
    global loaded_data, count

    count += 1

    print (count, loaded_data)
Deployment logs and logs of the first 2 runs :
Deployment's logs :

> Pod created successfully
> Importing step module
> Init count at : 0
> Step module imported successfully
> Execution "my-pipeline-1" started successfully
> Execution "my-pipeline-2" started successfully

"my-pipeline-1" logs :

> 1 [2, 3, 5, 7, 11, 13, 17, 19, 23, 29]

"my-pipeline-2" logs :

> 2 [2, 3, 5, 7, 11, 13, 17, 19, 23, 29]
Note
You can access to deployment logs by using the SDK function sdk.get_deployment_logs().
Example of usage:
Example of a step with LLM preloading
import time
from vllm import LLM, SamplingParams
from craft_ai_sdk import CraftAiSdk
import os
from io import StringIO

sampling_params = SamplingParams(temperature=0.8, top_p=0.95, max_tokens=1024)
llm = LLM(
    model="TheBloke/Mistral-7B-Instruct-v0.2-AWQ",
    quantization="awq",
    dtype="half",
    max_model_len=16384,
)

def persitent_data_step(message: str):
    global llm

    output = llm.generate([message], sampling_params)[0]

    return {
        "results": output.outputs[0].text,
    }