Part 2: Execute a simple ML model
The previous part showed the main concepts of the platform and how to use the basics of the SDK. With what you already know you are able to execute really simple pipelines. But in order to build more realistic applications, using more complex code on your data with dependencies such as Python libraries, it is needed to learn more advanced functionnalities and especially how to configure the execution context of a step and how to retrieve data stored on the platform.
This page will present the same commands as the previous ones going through more available functionalities offered by the platform, with a real Machine Learning use case. We will improve this Machine Learning application later in Part 3 and Part 4.
You can find all the code used in this part and its structure here.
Prerequisites
- Python 3.8 or higher is required to be installed on your computer.
- Have done the Part 1: Execute a simple pipeline.
Overview of the use case
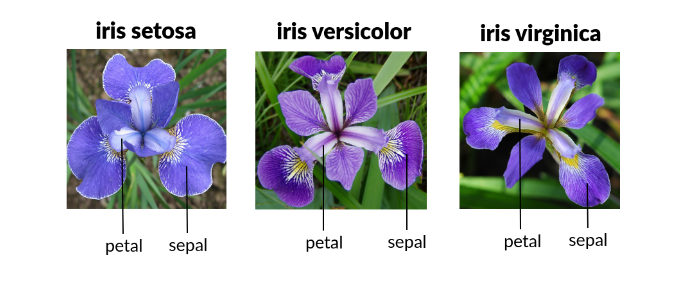
We will build a pipeline to train and store a simple ML model with the iris dataset. The iris dataset describes four features (petal length, petal width, sepal length, sepal width) from three different types of irises (Setosa, Veriscolour, Virginica).
The goal of our application is to classify flower type based on the previous four features. In this part we will start our new use case by retrieving the iris dataset from the Data Store (that we will introduce just below), building a pipeline to train a simple ML model on the dataset and store it on the Data Store.
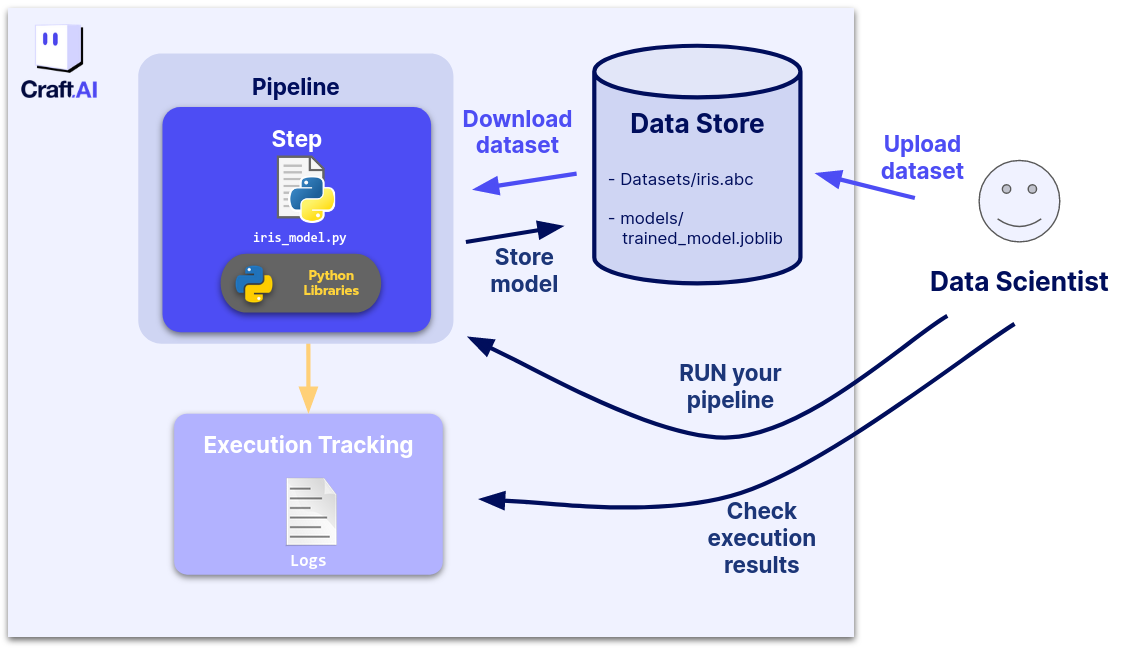
Storing data on the platform
The Data Store is a file storage on which you can upload and download unlimited files and organize them as you want using the SDK. All your steps can download and upload files from and to the Data Store.
Pushing the iris dataset to the Data Store:
In our case the first thing we want to do is to upload the iris dataset to the Data Store.
You can do so with the upload_data_store_object function from the SDK like so:
from io import BytesIO
from sklearn import datasets
import pandas as pd

iris = datasets.load_iris(as_frame=True)
iris_df = pd.concat([iris.data, iris.target], axis=1)

file_buffer = BytesIO(iris_df.to_parquet())
sdk.upload_data_store_object(
   filepath_or_buffer=file_buffer,
   object_path_in_datastore="get_started/dataset/iris.parquet"
)
The argument filepath_or_buffer can be a string or a file-like object.
If a string, it is the path to the file to be uploaded,
if a file-like object you have to pass an IO object (something you don't write to the disk
but stay in the memory). Here we choose to use a BytesIO object.
Source code for model training
We will use the following code that trains a sklearn KNN classifier on the iris dataset from the Data Store and put the trained model on the Data Store.
import joblib
import numpy as np
import pandas as pd
from sklearn.neighbors import KNeighborsClassifier
from craft_ai_sdk import CraftAiSdk

def trainIris():

   sdk = CraftAiSdk()

   sdk.download_data_store_object(
      object_path_in_datastore="get_started/dataset/iris.parquet",
      filepath_or_buffer="iris.parquet",
   )
   dataset_df = pd.read_parquet("iris.parquet")

   X = dataset_df.loc[:, dataset_df.columns != "target"].values
   y = dataset_df.loc[:, "target"].values

   np.random.seed(0)
   indices = np.random.permutation(len(X))

   n_train_samples = int(0.8 * len(X))
   train_indices = indices[:n_train_samples]
   val_indices = indices[n_train_samples:]

   X_train = X[train_indices]
   y_train = y[train_indices]
   X_val = X[val_indices]
   y_val = y[val_indices]

   knn = KNeighborsClassifier()
   knn.fit(X_train, y_train)

   mean_accuracy = knn.score(X_val, y_val)
   print("Mean accuracy:", mean_accuracy)

   joblib.dump(knn, "iris_knn_model.joblib")

   sdk.upload_data_store_object(
      "iris_knn_model.joblib", "get_started/models/iris_knn_model.joblib"
   )
Delete objects
Before we really start building our new use case, we might want to clean the platform from the objects we created in Part 1. To do this, we need to use the functions associated with each object, here the pipeline and the step.
Warning
These objects have dependencies on each other, we have to delete them in a certain order. First the pipeline, then the step.
sdk.delete_pipeline(pipeline_name="part-1-hello-world")

sdk.delete_step(step_name="part-1-hello-world")
Advanced step configuration
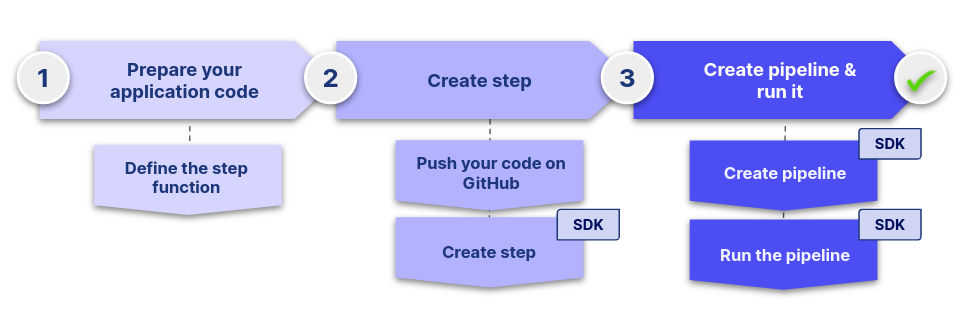
In the rest of this part we will follow the same workflow as in the previous one:
Now it is time to use the create_step() method of craft-ai-sdk
object to create step like before. This time, we will define a bit more the step and its execution context. We are going to focus on two parameters.
Python libraries
As you might have noticed, the code above uses external Python libraries (craft_ai_sdk, joblib, numpy, pandas and scikit learn). In the previous step we built an application that didn’t require any external dependency. This time if we want this code to work on the platform we have to inform it that this step requires some Python libraries to run properly.
To do so we create a requirements.txt file,
containing the list of Python libraries used in our step function:
craft_ai_sdk==xx.xx.xx
joblib==xx.xx.xx
numpy==xx.xx.xx
scikit_learn==xx.xx.xx
pandas==xx.xx.xx
pyarrow==xx.xx.xx
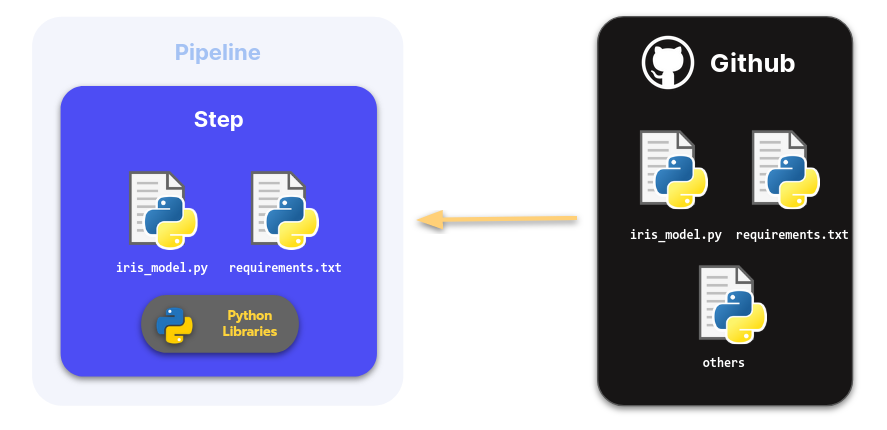
In this case, we place it at the root of the repo, but you can put it wherever you want.
Warning
Regarding the code, the platform only sees what’s on your repository so don’t forget to push your requirement file on your Git repository.
You can now specify the path by default of this file in the Libraries & Packages section of your project settings using the web interface and all the steps created in this project will have these libraries installed and ready to be used.
Included folders
When creating your step, you may not need to include all the files of
your project repositories in your step. You can specify the file(s) and
folder(s) to include from the GitHub / GitLab repository to prevent the step from
accessing all code available in the repository by default, using the
included_folders option.
Once again you can set this option in your project settings page in the web interface in the Folders field.
Success
🎉 Now all the steps created in this project will have the relevant libraries installed and only the necessary files will be included
Create a step
You can see different parameters from the frontend, on the project setting. Like the Python version you are using, information on your Git connection (the repository URL, the deploy key, the branch and the folders used by default) and the libraries and packages installed on the project.
By default, your step will apply those parameters during its creation (that is why you didn’t need to add any parameters
when creating your step in Part 1).
However, sometimes you want to define them only at the step level and keep the previous ones at the project level.
This is the role of the create_step() function’s parameter container_config . You can pass as a dictionary the
set of parameters you want to use for the step creation. It allows you to be really specific in the execution context of your step.
💡 For example, if you need to build a step embedding a function from
another repository, you can specify the new Git repository URL and
deploy key at the step level using the container_config parameter.
Your project parameters will remain unchanged.
Warning
The execution context of a step is non persistent. It means that as soon as the execution is done, everything written in memory and on disk during the execution will be deleted. Therefore, a step is not the right place to store data or any information. You should use the Data Store* instead.
Here we will specify the requirements_path and the
included_folders.
To take into account requirements.txt file, we must add it to the container_config parameter with the requirements_path.
sdk.create_step(
    step_name="part-2-iristrain",
    function_path="src/part-2-irisModel.py",
    function_name="trainIris",
    description="This function creates a classifier model for iris",
    container_config = {
        "requirements_path" : "requirements.txt", #put here the path to the requirements.txt
        "included_folders" : ["src"]
    }
)
It may also be useful to describe precisely the steps created to be able
to understand their purpose afterward. To do so, you can fill in the
description parameter during the step creation.
To go further with step creation
If you want to create a step based on the code of a repository not indicated in the project (or just on another branch), you can also specify it during the step creation.
You can find all the function arguments you can modify here.
Success
🎉 Now your step has been created. You can now create your Pipeline.
From here, we reproduce the same steps as before with the creation of the pipeline and we execute it.
Create a pipeline
Create a pipeline with the create_pipeline() method of the SDK.
Execute your Pipeline and get the execution logs
Now you can execute your pipeline as in Part1.
You can find the list of executions with information and logs in the frontend on the Execution tracking page.
The output is a list of iris categories :
>> [2 0 2 0 2 2 0 0 2 0 0 0 1 2 2 0 0 0 1 1 0 0 1 0 2 1 2 1 0 2 0 2 0 0 2 0 2
1 1 1 2 2 2 1 0 1 2 2 0 1 1 2 1 0 0 0 2 1 2 0]
Success
🎉 You can now execute a more realistic Machine Learning pipeline.
Now that we can have more complex code in our steps and we know how to parametrize the execution context of our steps, we would like to be able to give it input elements to vary the result and receive the result easily. For this, we can use the input/output feature offered by the platform.
Next step: Part 3: Execute with input and output