Part 1: Execute a simple pipeline
The main goal of the Craft AI platform is to allow to deploy easily your machine learning pipelines.
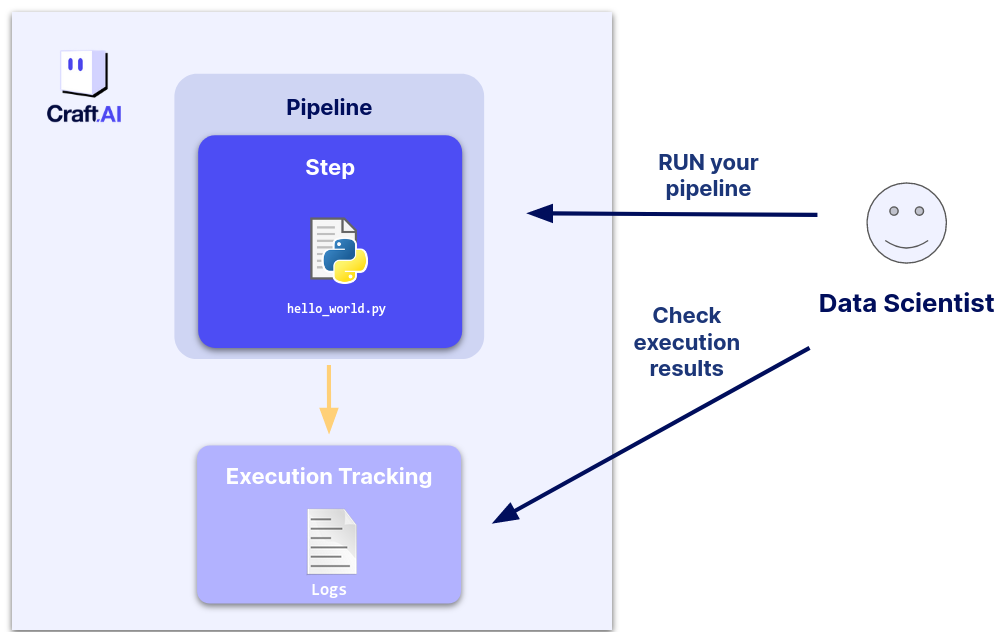
In this part we will use the platform to build a simple “hello world” application by showing you how to execute a basic Python code that prints “Hello world” and displays the number of days since January 1st, 2000.
You will learn how to:
- Package your application code into a pipeline on the platform
- Execute it on the platform
- Check the logs of the executions on the web interface
Note
All of the code in this example can also be found on GitHub here.
Create the pipeline content script
To facilitate this tutorial, please create a src folder that will contain the tutorial's files. Inside this folder, create a file named part-1-helloWorld.py.
import datetime

def helloWorld() -> None:

    # Count the number of days between January 1, 2000, and today
    start_date = datetime.datetime(2000, 1, 1)
    now = datetime.datetime.now()

    difference = now - start_date

    print(f'Hello world! Number of days since January 1, 2000: {difference.days}')
Create a pipeline
The first thing to do to build an application on the Craft AI platform is to create a pipeline.
A pipeline is the equivalent of a Python function in the Craft AI platform. It is a machine learning workflow, that can be easily deployed on the Craft AI platform. Like a regular function, a pipeline is defined by the inputs it ingests, the code it runs, and the outputs it returns.
A pipeline can be created from any Python function, using the create_pipeline() method of thesdk object.
Its main arguments for pipeline's creation are:
pipeline_nameis the name of the pipeline that will be created. This is the identifier you will use later to refer to this pipeline.function_pathargument is the path of the Python module containing the function that you want to execute for this pipeline. This path must be relative to thelocal_folderspecified in the container_config.function_nameargument is the name of the function that you want to execute for this pipeline.container_configis the configuration of the container that will be used to execute the function.
Get the full path of your src folder, and write it in the local_folder parameter in the following code.
sdk.create_pipeline(
    pipeline_name='part-1-hello-world',
    function_path='src/part-1-helloWorld.py',
    function_name='helloWorld',
    container_config={
        "local_folder": ".../get_started", # Enter the path to your local folder here, the one that contains `src/part-1-helloWorld.py`
    }
)
You should get the following output:
>>> Please wait while pipeline is being created. This may take a while...
>>> Pipelines creation succeeded
>>> {'name': 'part-1-hello-world'}
You can view the list of pipelines that you created in the platform with the list_pipelines() function of the SDK. You can run this in the terminal to get the list :
>>> [{'pipeline_name': 'part-1-hello-world',
>>>   'created_at': 'xxxx-xx-xxTxx:xx:xx.xxxZ',
>>>   'status': 'Ready'}]
You can see your pipeline and its status of creation at Ready.
Success
🎉 Now your pipeline has been created. You can now create Pipelines.
Execute your pipeline (run)
You can execute a pipeline on the platform directly with the run_pipeline() function.
This function has one mandatory argument:
pipeline_nameis the name of the existing pipeline to execute
Please run the following command in a terminal :
The output should look like this :
>>> The pipeline execution may take a while, you can check its status and get information on the Executions page of the front-end.
>>> Its execution ID is 'part-1-hello-world-xxxxx'.
>>> Pipeline execution results retrieval succeeded
>>> Pipeline execution startup succeeded
Success
🎉 Now, you have executed a pipeline for the helloWorld function ! Our hello world application is built and ready to be executed again!
Get information about an execution
Now, we have executed the pipeline. The return of the function allows us to see that the pipeline has been successfully executed; however, it does not provide the logs of the execution (we can receive outputs with the return of the run pipeline, but we did not put any here).
Once your pipeline is executed, you can now see the pipeline executions with the sdk.list_pipeline_executions() command.
>>> [{'execution_id': 'part-1-hello-world-XXXX',
>>> 'status': 'Succeeded',
>>> 'created_at': 'xxxx-xx-xxTxx:xx:xx.xxxZ',
>>> 'end_date': 'xxxx-xx-xxTxx:xx:xx.xxxZ',
>>> 'created_by': 'xxxxxxxx-xxxx-xxxx-xxxx-xxxxxxxx',
>>> 'pipeline_name': 'part-1-hello-world',
>>> 'steps':
>>>     [{'name': 'part-1-hello-world',
>>>       'status': 'Succeeded',
>>>       'end_date': 'xxxx-xx-xxTxx:xx:xx.xxxZ',
>>>       'start_date': 'xxxx-xx-xxTxx:xx:xx.xxxZ',
>>>       'requirements_path': 'requirements.txt'',
>>>       'origin': 'local'}]}]
Then, you can get the logs of an execution with the sdk.get_pipeline_execution_logs() command. You will have need the execution ID, which can be found with the previous command.
The logs are formatted line by line in JSON, but we can display them more simply with the print() command below. The logs also contain error messages if the execution encounters any.
Here is a complete sequence to print the logs of the execution to run in the terminal :
pipeline_executions = sdk.list_pipeline_executions(
    pipeline_name='part-1-hello-world'
)

logs = sdk.get_pipeline_execution_logs(
    execution_id=pipeline_executions[-1]['execution_id'] # [-1] to get the last execution
)

print('\n'.join(log['message'] for log in logs))
>>> Please wait while logs are being downloaded. This may take a while…
>>> Hello world! Number of days since January 1, 2000: xxx
Success
🎉 You can now get your execution's logs.
Note
To get more informations on the pipelines, please check Create a Pipeline or Manage a Pipeline.
What we have learned
In this part we learned how to easily build, deploy and use a simple application with the Craft AI platform with the following workflow:
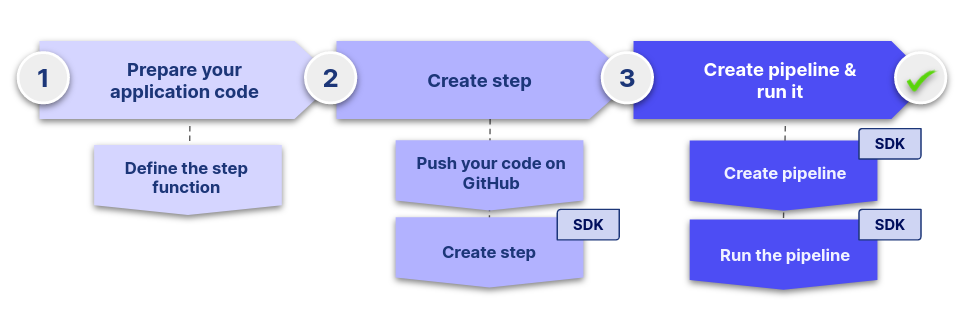
These 3 main steps are the fundamental workflow to work with the platform and we will see them over and over throughout this tutorial.
Now that we know how to run our code on the platform, it is time to create more complex pipelines to have a real ML use case.
Next step : Part 2: Execute a simple ML model